How To Print An Invoice? Step By Step Guide
Updated on March 28, 2019 | 7 min. read
Invoices are a key part of doing business. They provide a list of the services or products provided to a client, with a clear indication of how much is owed and why. Many invoices are sent electronically, but sometimes you may need to send a hard copy. Whether you send or receive an invoice, it’s a good idea to print it for your records or an internal approval process. The good news is printing an invoice is easy, but the steps vary depending on the software you’re using. Let’s walk you through it.


How to Print an Invoice
To print an invoice, open the invoice in the program you use, selecting “File” from the upper menu bar, then “Print” from the dropdown menu. This brings up a print screen, where you can select the number of copies you want, plus other settings.
Click “Print” and watch your printer do its thing. Keep in mind that the steps of printing invoices are slightly different across various operating systems.
But hold on—we’re getting ahead of ourselves. There are a few steps to get through before you print invoices. They include:
Fill Out the Invoice
An invoice needs to be filled out correctly if you create it from scratch before it's time to print. An invoice should have:
- The date
- An invoice number
- Vendor contact name, company name, address, phone number, and email
- Client contact name, company name, address, phone number, and email
- Purchase order number (if applicable)
- A description of products or services, including prices and quantities
- Delivery dates for products or services
- Subtotal
- Taxes
- Grand total
- Payment terms (i.e., payment due date)
- Late fees warning
- Payment options
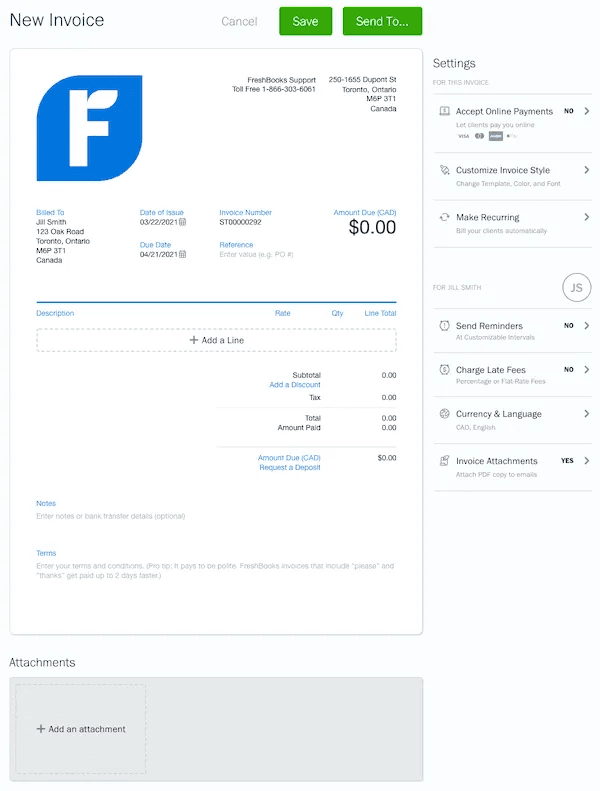
An invoicing software like FreshBooks creates and organizes professional-looking invoices with ease and guides you through the creation process. Here’s a quick summary of how to create an invoice with FreshBooks. Need a visual? Check out this short tutorial:
Preview the Invoice
Before you print it out, review the invoice. Make sure all the information is present and accurate—it’s important that the details are correct for you and the client you're billing. Never use the same invoice number twice. Once you’re sure the info is right, check the formatting by going to “File” on the upper menu bar, then “Print Preview” from the dropdown menu. A preview of your invoice will pop up so you can check the overall formatting and make sure everything looks professional.
If you’ve received an invoice and want to print an invoice record, review the details to ensure there aren’t any mistakes. That’s your hard-earned money, and you don’t want to pay more than you owe.


Print the Invoice
Here’s how to print your invoice using some of the more common software options:
1. MS Excel
- Select the worksheet you want to print (these are the sheet tabs at the bottom)
- Select FILE > Print. If you prefer shortcuts, you can press Ctrl+P on Windows or Command+P on Mac
- Adjust settings as you see fit, such as to print multiple invoices
- Click Print
2. Google Sheets
- Select the worksheet you want to print
- At the top of the page, select FILE > Print. You can also press Ctrl+P on Windows, Command+P on Mac, or select the printer icon near the top of the page
- Click Current sheet
- Pick Portrait, assuming your invoice is formatted vertically
- Click Next
- Select Print
3. Google Docs
- At the top of the page, select FILE > Print, or shortcuts Ctrl+P on Windows, Command+P on Mac. You can also select the printer icon
- Select Print
4. PDF
Printing your PDF will vary a tiny bit depending on the software your computer uses to open the document. However, the major steps should remain the same:
- Select FILE > Print
- Adjust settings if necessary
- Select Print
Another way to print invoices is through invoicing software like FreshBooks. FreshBooks invoicing systems make the creation, management, and printing of invoices simple and stress-free. Here’s how easy the printing process is with FreshBooks:
- In the invoice section, click on the three dots icon for the desired invoice
- Select “Print” in the drop-down menu

Easy, right? If you’d like to practice creating invoices, you can experiment with this free invoice template.
How To Send An Invoice
Whether you’re billing a client an invoice by mail or email, there are a few straightforward steps to get it done right:
1. Via mail
- Print your select invoices using the above steps.
- Fold the invoice cleanly and insert it into an envelope. Make sure the envelope is filled out to the correct address.
- Don’t forget to include postage.
- Stick it in the mailbox.
2. Via Email
- To email your invoice, save it to your computer in the Desktop or Downloads folder.
- Open your email program.
- Begin a “New Email” or “New Message.”
- In the “To” line, put the email address of the person you wish to send the email to.
- In the subject line, write your name or the company name, plus the invoice number. For instance, “Peter Peterson, Invoice #4723”.
- In the body of the email, let your client know you’re attaching an invoice. It’s also a good practice to include the invoice number here. For instance, “Hi Peter, please find attached my invoice (Invoice #4723) for last week’s project. Have a good weekend.”
- To attach the email, look for “Attach File” in the email’s menu bar—it’ll be the one with the paperclip icon. Click on it.
- Click on “Browse this PC” then “Desktop” or “Downloads,” depending on where you saved it (on a Mac, you might see the “Desktop” folder immediately).
- Double-click on your file.
- Your email box will now reappear:
– On your PC (in Outlook), you’ll see a new “Attached” section under “Subject” with a little icon. That icon shows you the type of file you’ve attached (for instance, a PDF) and the file's name.
– On a Mac, you’ll see the file at the bottom of your email. - In the top menu, towards the left, select “Send.”
- Now you've sent your invoice.
3. With FreshBooks
FreshBooks invoicing not only simplifies invoice creation but it makes sending those invoices fast and easy. Here are the steps with FreshBooks:
- Create your invoice. Or, if already created, open it.
- Select “Send” to see a final overview. The client’s email address and subject line should be filled out automatically by FreshBooks. Confirm the information.
- Hit “Send Invoice.”
- Yes, it’s that simple.
If you want to learn more, follow our guide on How to Sent an Invoice. In this guide, we explain when and how to send invoices, along with different methods for sending them.

Choose FreshBooks for All Your Invoicing Needs
Sometimes, you may need to print your invoices, either for your own records or to send to someone you’re billing. Other times, you’ll be emailing your invoice. Printing is fairly straightforward with most software, as is emailing. However, a program like FreshBooks makes invoicing fast and easy. FreshBooks takes out the stress of updating, managing, and keeping track of invoices, plus printing and emailing can be done in just a few steps. Whether you’re working solo, have a small team, or run a giant operation, invoicing software like FreshBooks will bring your invoicing game to the next level.


FAQs On How To Print An Invoice
Does an Invoice Need to Be Printed?
A printed invoice is nice to have, but it's not necessary. However, it’s crucial that you keep clear records and have your invoices accessible at any time. If you’re not printing invoices for hardcopy records, make sure you’re saving invoices and have good digital records. An invoicing service like FreshBooks can help.
How do I Find the Invoice Number?
The invoice number should be clearly labeled, typically near the top of the invoice. If you’re creating an invoice, it’s critical to ensure you don’t reuse a previous invoice number. Accounting programs like FreshBooks keep your invoice numbers in order, allowing you to devote energy to more important tasks for your business.
Should Invoices Be in PDF or Word?
Always convert invoices to PDF. Unlike other formats, such as Word, PDF keeps the formatting consistent no matter what program opens it, which makes this format ideal for businesses. Any changes made to the PDF leave an electronic footprint, which makes tracking changes easy. PDFs typically decrease file size as well, plus they provide additional security options, like password protection.


